| [unchecked revision] | [pending review revision] |
(Page créée avec « {{Tuto Details |Main_Picture=Photometric_Measurement_img15.jpg |Main_Picture_annotation={"version":"2.4.6","objects":[{"type":"image","version":"2.4.6","originX":"left","o... ») |
|||
| Line 2: | Line 2: | ||
|Main_Picture=Photometric_Measurement_img15.jpg | |Main_Picture=Photometric_Measurement_img15.jpg | ||
|Main_Picture_annotation={"version":"2.4.6","objects":[{"type":"image","version":"2.4.6","originX":"left","originY":"top","left":-46,"top":0,"width":800,"height":444,"fill":"rgb(0,0,0)","stroke":null,"strokeWidth":0,"strokeDashArray":null,"strokeLineCap":"butt","strokeDashOffset":0,"strokeLineJoin":"miter","strokeMiterLimit":4,"scaleX":1.02,"scaleY":1.02,"angle":0,"flipX":false,"flipY":false,"opacity":1,"shadow":null,"visible":true,"clipTo":null,"backgroundColor":"","fillRule":"nonzero","paintFirst":"fill","globalCompositeOperation":"source-over","transformMatrix":null,"skewX":0,"skewY":0,"crossOrigin":"","cropX":0,"cropY":0,"src":"http://demo-master.dokit.io/w/images/b/bb/Photometric_Measurement_img15.jpg","filters":[]}],"height":449.4339622641509,"width":600} | |Main_Picture_annotation={"version":"2.4.6","objects":[{"type":"image","version":"2.4.6","originX":"left","originY":"top","left":-46,"top":0,"width":800,"height":444,"fill":"rgb(0,0,0)","stroke":null,"strokeWidth":0,"strokeDashArray":null,"strokeLineCap":"butt","strokeDashOffset":0,"strokeLineJoin":"miter","strokeMiterLimit":4,"scaleX":1.02,"scaleY":1.02,"angle":0,"flipX":false,"flipY":false,"opacity":1,"shadow":null,"visible":true,"clipTo":null,"backgroundColor":"","fillRule":"nonzero","paintFirst":"fill","globalCompositeOperation":"source-over","transformMatrix":null,"skewX":0,"skewY":0,"crossOrigin":"","cropX":0,"cropY":0,"src":"http://demo-master.dokit.io/w/images/b/bb/Photometric_Measurement_img15.jpg","filters":[]}],"height":449.4339622641509,"width":600} | ||
| − | |Description=Perform a photometric measurement at the FTTH network subscriber's home. | + | |Description=<translate>Perform a photometric measurement at the FTTH network subscriber's home.</translate> |
|Categories=Work instructions | |Categories=Work instructions | ||
|Difficulty=Easy | |Difficulty=Easy | ||
| Line 12: | Line 12: | ||
}} | }} | ||
{{Introduction | {{Introduction | ||
| − | |Introduction= | + | |Introduction=<translate></translate> |
}} | }} | ||
{{TutoVideo | {{TutoVideo | ||
| Line 19: | Line 19: | ||
{{Materials}} | {{Materials}} | ||
{{Tuto Step | {{Tuto Step | ||
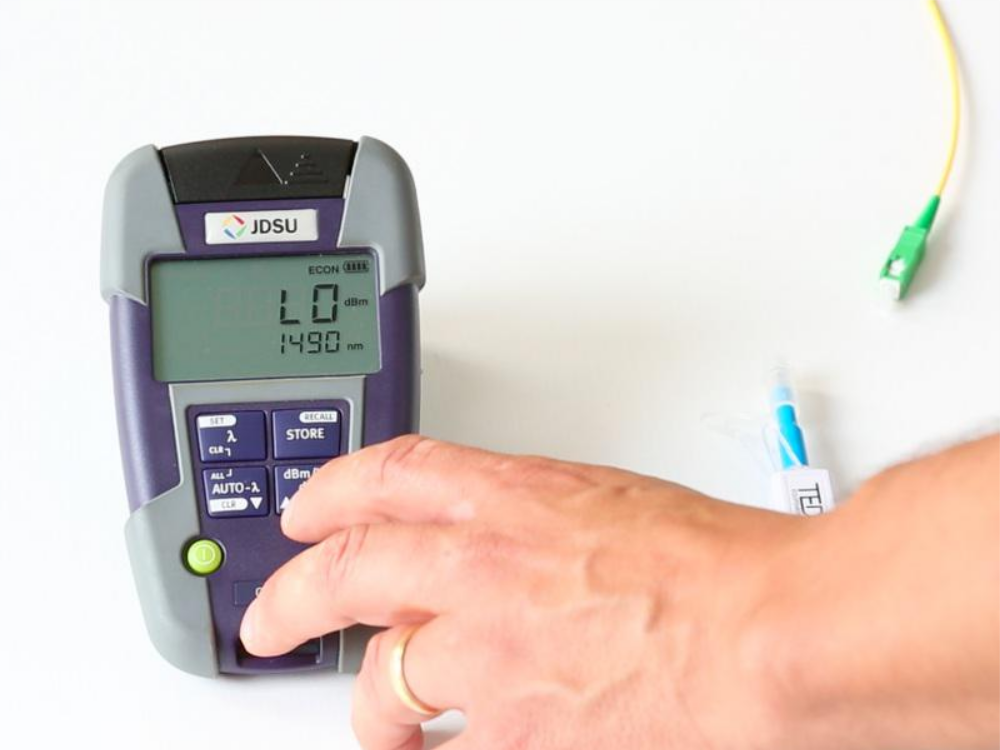
| − | |Step_Title= | + | |Step_Title=<translate>Switch on and configure the device</translate> |
| − | |Step_Content=After switching on the device, check and set the measuring wavelength to 1490 nm, the wavelength of the downlink flow, if necessary. | + | |Step_Content=<translate>After switching on the device, check and set the measuring wavelength to 1490 nm, the wavelength of the downlink flow, if necessary. |
| − | Set the unit of measurement to dBm as stipulated in the operators' procedures. | + | Set the unit of measurement to dBm as stipulated in the operators' procedures.</translate> |
|Step_Picture_00=Photometric_Measurement_img63.jpg | |Step_Picture_00=Photometric_Measurement_img63.jpg | ||
|Step_Picture_00_annotation={"version":"2.4.6","objects":[{"type":"image","version":"2.4.6","originX":"left","originY":"top","left":-107,"top":0,"width":800,"height":505,"fill":"rgb(0,0,0)","stroke":null,"strokeWidth":0,"strokeDashArray":null,"strokeLineCap":"butt","strokeDashOffset":0,"strokeLineJoin":"miter","strokeMiterLimit":4,"scaleX":0.89,"scaleY":0.89,"angle":0,"flipX":false,"flipY":false,"opacity":1,"shadow":null,"visible":true,"clipTo":null,"backgroundColor":"","fillRule":"nonzero","paintFirst":"fill","globalCompositeOperation":"source-over","transformMatrix":null,"skewX":0,"skewY":0,"crossOrigin":"","cropX":0,"cropY":0,"src":"http://demo-master.dokit.io/w/images/c/c5/Photometric_Measurement_img63.jpg","filters":[]}],"height":449.25619834710744,"width":600} | |Step_Picture_00_annotation={"version":"2.4.6","objects":[{"type":"image","version":"2.4.6","originX":"left","originY":"top","left":-107,"top":0,"width":800,"height":505,"fill":"rgb(0,0,0)","stroke":null,"strokeWidth":0,"strokeDashArray":null,"strokeLineCap":"butt","strokeDashOffset":0,"strokeLineJoin":"miter","strokeMiterLimit":4,"scaleX":0.89,"scaleY":0.89,"angle":0,"flipX":false,"flipY":false,"opacity":1,"shadow":null,"visible":true,"clipTo":null,"backgroundColor":"","fillRule":"nonzero","paintFirst":"fill","globalCompositeOperation":"source-over","transformMatrix":null,"skewX":0,"skewY":0,"crossOrigin":"","cropX":0,"cropY":0,"src":"http://demo-master.dokit.io/w/images/c/c5/Photometric_Measurement_img63.jpg","filters":[]}],"height":449.25619834710744,"width":600} | ||
| Line 32: | Line 32: | ||
}} | }} | ||
{{Tuto Step | {{Tuto Step | ||
| − | |Step_Title= | + | |Step_Title=<translate>Connecting the equipment</translate> |
| − | |Step_Content=Use the optical garter that connects the optical terminal socket (OTS) to the customer's optical fibre box (OFB) to perform the measurement. | + | |Step_Content=<translate>Use the optical garter that connects the optical terminal socket (OTS) to the customer's optical fibre box (OFB) to perform the measurement. |
Clean the surface of the optical connectors at the first end of the garter and OTS with a cleaning pen. Connect the optical garter to the OTS. Proceed in the same way for the connector at the other end and connect it to the photometer. | Clean the surface of the optical connectors at the first end of the garter and OTS with a cleaning pen. Connect the optical garter to the OTS. Proceed in the same way for the connector at the other end and connect it to the photometer. | ||
| − | <br /> | + | <br /></translate> |
|Step_Picture_00=Photometric_Measurement_img69.jpg | |Step_Picture_00=Photometric_Measurement_img69.jpg | ||
|Step_Picture_00_annotation={"version":"2.4.6","objects":[{"type":"image","version":"2.4.6","originX":"left","originY":"top","left":-138,"top":-3,"width":800,"height":444,"fill":"rgb(0,0,0)","stroke":null,"strokeWidth":0,"strokeDashArray":null,"strokeLineCap":"butt","strokeDashOffset":0,"strokeLineJoin":"miter","strokeMiterLimit":4,"scaleX":1.02,"scaleY":1.02,"angle":0,"flipX":false,"flipY":false,"opacity":1,"shadow":null,"visible":true,"clipTo":null,"backgroundColor":"","fillRule":"nonzero","paintFirst":"fill","globalCompositeOperation":"source-over","transformMatrix":null,"skewX":0,"skewY":0,"crossOrigin":"","cropX":0,"cropY":0,"src":"http://demo-master.dokit.io/w/images/b/b7/Photometric_Measurement_img69.jpg","filters":[]}],"height":449.7153700189753,"width":600} | |Step_Picture_00_annotation={"version":"2.4.6","objects":[{"type":"image","version":"2.4.6","originX":"left","originY":"top","left":-138,"top":-3,"width":800,"height":444,"fill":"rgb(0,0,0)","stroke":null,"strokeWidth":0,"strokeDashArray":null,"strokeLineCap":"butt","strokeDashOffset":0,"strokeLineJoin":"miter","strokeMiterLimit":4,"scaleX":1.02,"scaleY":1.02,"angle":0,"flipX":false,"flipY":false,"opacity":1,"shadow":null,"visible":true,"clipTo":null,"backgroundColor":"","fillRule":"nonzero","paintFirst":"fill","globalCompositeOperation":"source-over","transformMatrix":null,"skewX":0,"skewY":0,"crossOrigin":"","cropX":0,"cropY":0,"src":"http://demo-master.dokit.io/w/images/b/b7/Photometric_Measurement_img69.jpg","filters":[]}],"height":449.7153700189753,"width":600} | ||
}} | }} | ||
{{Tuto Step | {{Tuto Step | ||
| − | |Step_Title= | + | |Step_Title=<translate>Reading the signal strength</translate> |
| − | |Step_Content=The measurement of the optical power is read directly from the photometer. | + | |Step_Content=<translate>The measurement of the optical power is read directly from the photometer. |
| Line 50: | Line 50: | ||
| − | After the measurement, connect the garter to the customer's box (or at the test OFB). | + | After the measurement, connect the garter to the customer's box (or at the test OFB).</translate> |
|Step_Picture_00=Photometric_Measurement_img84.jpg | |Step_Picture_00=Photometric_Measurement_img84.jpg | ||
|Step_Picture_00_annotation={"version":"2.4.6","objects":[{"type":"image","version":"2.4.6","originX":"left","originY":"top","left":-48,"top":-2,"width":800,"height":443,"fill":"rgb(0,0,0)","stroke":null,"strokeWidth":0,"strokeDashArray":null,"strokeLineCap":"butt","strokeDashOffset":0,"strokeLineJoin":"miter","strokeMiterLimit":4,"scaleX":1.03,"scaleY":1.03,"angle":0,"flipX":false,"flipY":false,"opacity":1,"shadow":null,"visible":true,"clipTo":null,"backgroundColor":"","fillRule":"nonzero","paintFirst":"fill","globalCompositeOperation":"source-over","transformMatrix":null,"skewX":0,"skewY":0,"crossOrigin":"","cropX":0,"cropY":0,"src":"http://demo-master.dokit.io/w/images/c/c7/Photometric_Measurement_img84.jpg","filters":[]}],"height":450,"width":600} | |Step_Picture_00_annotation={"version":"2.4.6","objects":[{"type":"image","version":"2.4.6","originX":"left","originY":"top","left":-48,"top":-2,"width":800,"height":443,"fill":"rgb(0,0,0)","stroke":null,"strokeWidth":0,"strokeDashArray":null,"strokeLineCap":"butt","strokeDashOffset":0,"strokeLineJoin":"miter","strokeMiterLimit":4,"scaleX":1.03,"scaleY":1.03,"angle":0,"flipX":false,"flipY":false,"opacity":1,"shadow":null,"visible":true,"clipTo":null,"backgroundColor":"","fillRule":"nonzero","paintFirst":"fill","globalCompositeOperation":"source-over","transformMatrix":null,"skewX":0,"skewY":0,"crossOrigin":"","cropX":0,"cropY":0,"src":"http://demo-master.dokit.io/w/images/c/c7/Photometric_Measurement_img84.jpg","filters":[]}],"height":450,"width":600} | ||
| Line 58: | Line 58: | ||
{{Notes}} | {{Notes}} | ||
{{PageLang | {{PageLang | ||
| + | |Language=en | ||
|SourceLanguage=none | |SourceLanguage=none | ||
|IsTranslation=0 | |IsTranslation=0 | ||
| − | |||
}} | }} | ||
{{Tuto Status | {{Tuto Status | ||
| − | |Complete= | + | |Complete=Published |
}} | }} | ||
Revision as of 15:53, 7 June 2019


Mp4
Step 1 - Switch on and configure the device
After switching on the device, check and set the measuring wavelength to 1490 nm, the wavelength of the downlink flow, if necessary.
Set the unit of measurement to dBm as stipulated in the operators' procedures.


Step 2 - Connecting the equipment
Use the optical garter that connects the optical terminal socket (OTS) to the customer's optical fibre box (OFB) to perform the measurement.
Clean the surface of the optical connectors at the first end of the garter and OTS with a cleaning pen. Connect the optical garter to the OTS. Proceed in the same way for the connector at the other end and connect it to the photometer.

Step 3 - Reading the signal strength
The measurement of the optical power is read directly from the photometer.
The value should generally be between -16 dBm and -24 dBm.
After the measurement, connect the garter to the customer's box (or at the test OFB).


Published
 Français
 English
 Deutsch
 Español
 Italiano
 Português